
WordPress is one of the best and easy to use content management systems we have today. It comes with a simple login page, which some people might not find appealing. In this tutorial, I am going to share a very simple way that one can easily customize the login page using the Adjusting the Logo’s Length and WidthCustom Login Page Customizer plugin. This plugin allows you to customize the login page from the WordPress customizer, preview the changes then save them. It is very good for styling the login page without touching the code. We are going to cover the following;
- Customizing the logo.
- Customizing the background color and images.
- Customizing the form.
- Customizing the fields.
- Customizing the button.
Getting Started
To get started, I am going to assume that you have WordPress installed and running. The first step will be to install and activate the plugin. To do so, you can follow these steps;
- Download the plugin from here or download it directly from the WordPress admin panel.

Installing Custom Login Page Customizer Plugin - If you downloaded the plugin from the link above, upload it to your wp-content/plugins directory.
- Navigate to the Plugins menu in WordPress and activate the plugin.

To start using the plugin, navigate to Appearance > Custom Login Page Customizer on your WordPress dashboard. You will be taken to the following page.

Here, the plugin provides you with templates that you can adopt. You can also be able to customize the background, logo, form, fields, button and add custom CSS. We are going to start with the logo.
1. Customizing the Logo.
To customize the logo, select logo on the left hand side menu on the customizer page.

To edit or add a logo, we need to make sure that the Disable Logo button is turned off to enable the logo. If you have already designed a logo for use and you have it saved somewhere on your computer, click on the Select Image button to upload it. Navigate to the location where you have it saved and click on it to upload. I am going to upload this logo;

Once that is done, you will now be able to change your logo’s width, height and padding to meet your preferred settings. You can also preview the changes that you are making before you can save them.
My logo above looks quite squeezed together, meaning that I need to adjust its length and width to get it right. On the left hand side, we have options for adjusting the width, height and the padding bottom. We can also add a link to a page that a user will be taken to when they click the logo. After making the adjustments, this is how my logo looks like.
Click on the Publish button on the top left when you are done to save the changes, then click on the back arrow (button) to go back to the login customization home page.
2. Customizing the Background color and Images.
To customize the background color and images, we are going to click on the Background option on the left hand side menu of the customizer page. This will take us to this page;

We will start by customizing the background color. To do that, simply click on the Select Color button on the top left hand side then click on the color that you want. On the right hand side, you can drag the color picker to get the exact color.

If you have the color code for your background color, type it in on the field adjacent to the Select Color button.

When done, click on the Publish button on the top left to save your changes. You can add a background image while still at this page. To do so, click on the Select Image button just below the color customization section. This will take you to your WordPress media library where you can either select an image or upload one from your computer.

Once you have your background image uploaded, you will get options just below it to customize the background size, repeat and position of the image. Under background size, you can choose the original, fit to screen, fill screen or add a custom size. Under background repeat, you can choose from No Repeat, Repeat, Repeat Horizontally and Repeat Vertically. You can also click on a background position for the image. After you are done, click on Publish to save your changes and click on the back button to continue with the customization.
3. Customizing the Form.
This plugin allows you to customize the form’s background image, color, width, height, padding, radius, shadow spread and the box shadow of the form.
- Background Image and Color
To customize the background image, click on the Select Image button to select an image from your WordPress media files or to upload one from your computer.

If you prefer a background color to an image, you can click on the Select Color button just below the background image. You can change the opacity by dragging the opacity pointer just below the color change area.

- Width, Height, Padding and Radius
Just below color customization, we can resize the width, height, padding and the radius of the login form by simply dragging the resize button. I am going to change the width to 391px, height to 196px, padding top, bottom, left and right to 30px, 40px, 25px and 25px respectively and the radius to 52px to get me this;

You can also add a box shadow color and customize how you want it spread while still at this page. Remember to click on the Publish button to save your changes.
4. Customizing the Fields.
To customize the login page form fields, click on the Fields option on the customizer home screen. This will take you to the page shown below;

Here, you can disable/enable the Remember Me button, customize the form width, font size, border width, border color radius, margin, padding, background color, text color, label color and label text size.
On my login page, I am going to disable to Remember Me button, keep the width at 100px, reduce the font size to 20px, increase the border width to 7px, change the border color, change the radius to 12px, keep the margin and padding at the default and change the label color to white. A review of my changes gives me this;
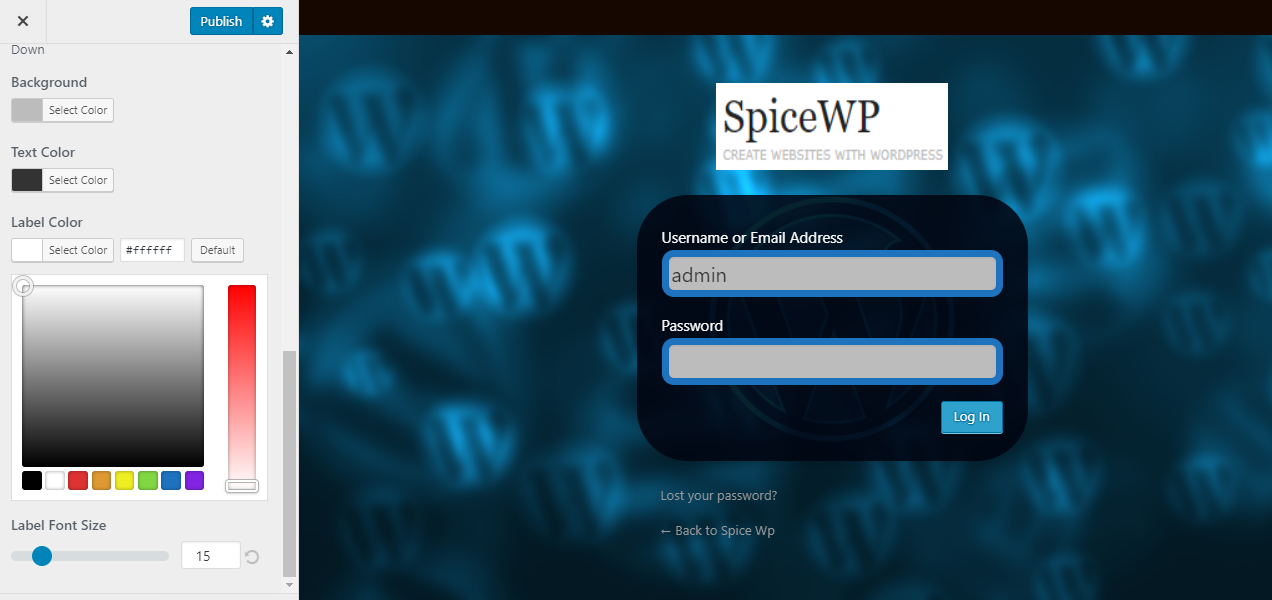
Remember to click on the Publish button to save the changes.
5. Customizing the Button.
Lastly, we are going to customize the login button on this page. We can change the background and hover colors, button size, font size, text color, padding, border (including width and color), the box shadow and text shadow. At the customizer home page, click on the Button option. This will take you to this page;

Here, we are going to change the background and the hover colors, the button width and the shadow spread to get a login screen that looks like this;

Click on the publish button when done to save the changes.
Conclusion
Going to my WordPress login page, here is the new page that I get.

It is important to note that this plugin allows us to make all these changes without touching any piece of code. If you would like to change the code directly without the use of a plugin, you can check this tutorial which shares various techniques which can be used to customize the WordPress login form without using a plugin.
- How to add Categories in WordPress Media Library - February 4, 2020
- How to Redirect 404 page to the Home Page in WordPress - January 28, 2020
- How to Backup WordPress Website to DropBox - January 22, 2020