
WordPress taxonomies allow one to sort any WordPress post type into categories for easier access. WordPress post types include posts, pages, attachments, and any other custom post types. Images in the media library fall under the attachments post types.
In this post, we are going to discuss how to add categories in the WordPress media library. This is important since it can help one to sort and find images fast and with ease. We are going to use the Media Library Categories plugin for this process.
Step 1: Installing the Media Library Categories Plugin
The first step will be to install the plugin. For more details on how to install the plugin, check out our post here.
Step 2: Activating the Plugin
Depending on how you installed the plugin, you will need to activate it before you can use it. If you uploaded it from your computer, click the activate plugin button shown below;

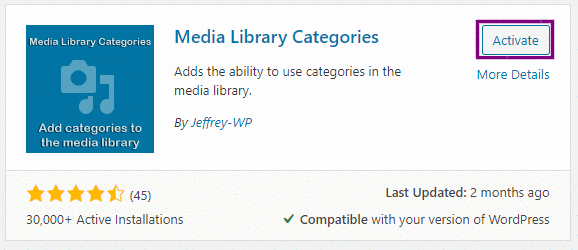
If you installed the plugin from the WordPress plugin repository, click the activate plugin button shown below;
Finally, if you manually uploaded the plugin through an FTP client, log in to the WordPress admin dashboard and navigate to Plugins then click the Activate link on the Media Library Categories plugin as shown below;

Step 3: Adding Categories
The plugin works out of the box and does not require any settings and configuration. After successful installation, navigate to Media > Categories to add new categories as shown below.

You will be taken to another page where you can type in the category names, slug, add a parent category and the description. Add the categories that you want here.


Step 4: Adding Media to Categories
Assuming that you already have media on the media library, we are going to add them to the different categories that we have just created.
To do that, navigate to Media > Library or just click on the Media option on the left-hand side of the admin dashboard.

On the media page, click on the list view button on the top left to open the media library in a list view.

As the mouse hovers over an image, you will see an Edit button under each of the images. Click on the Edit button to edit the categories of a particular image.

You will notice that you have a new meta box on the right-hand side of the image edit screen. This is the image category meta box

Select the category for the image then click on the Update button just above the categories meta box. If you forgot to add the category you want for this media file, you can click on the Add New Category to add the new category.
Click on the Update button to save the changes.
Conclusion
With just a few steps and without writing any line of code, you are now able to add categories to the media library on WordPress. Let us know in the comment section below if you are facing any problems and we will try to help.
- How to add Categories in WordPress Media Library - February 4, 2020
- How to Redirect 404 page to the Home Page in WordPress - January 28, 2020
- How to Backup WordPress Website to DropBox - January 22, 2020